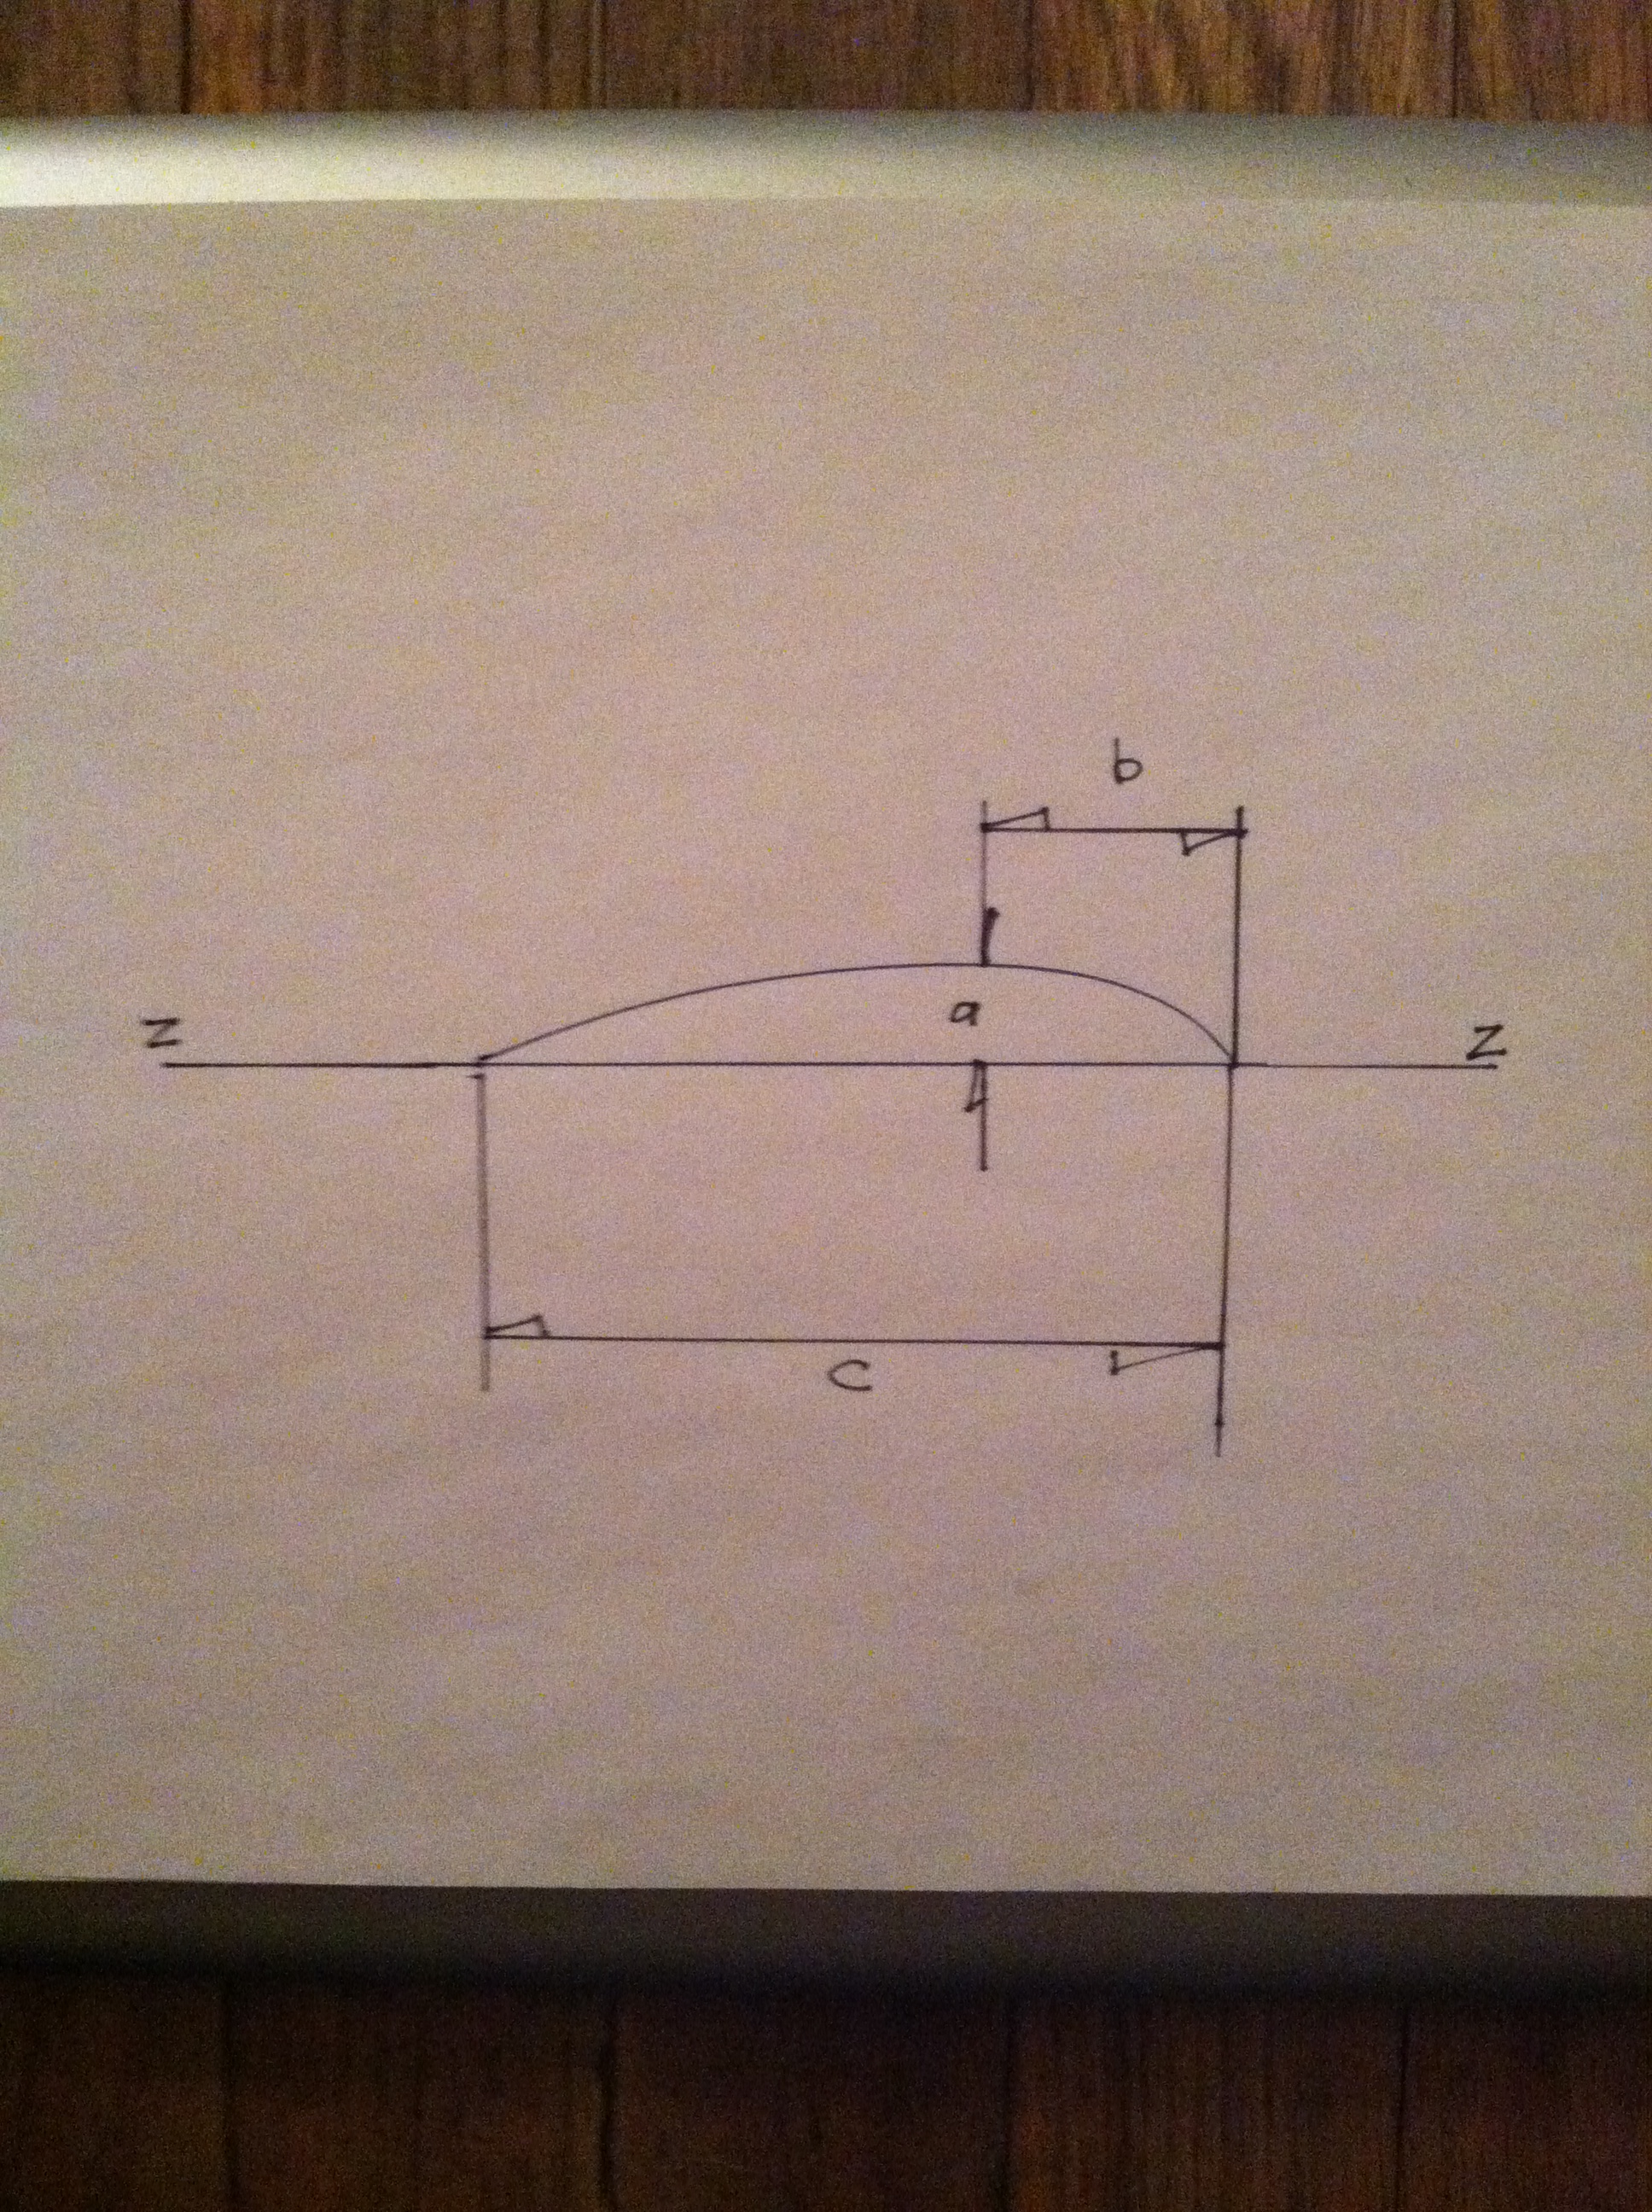
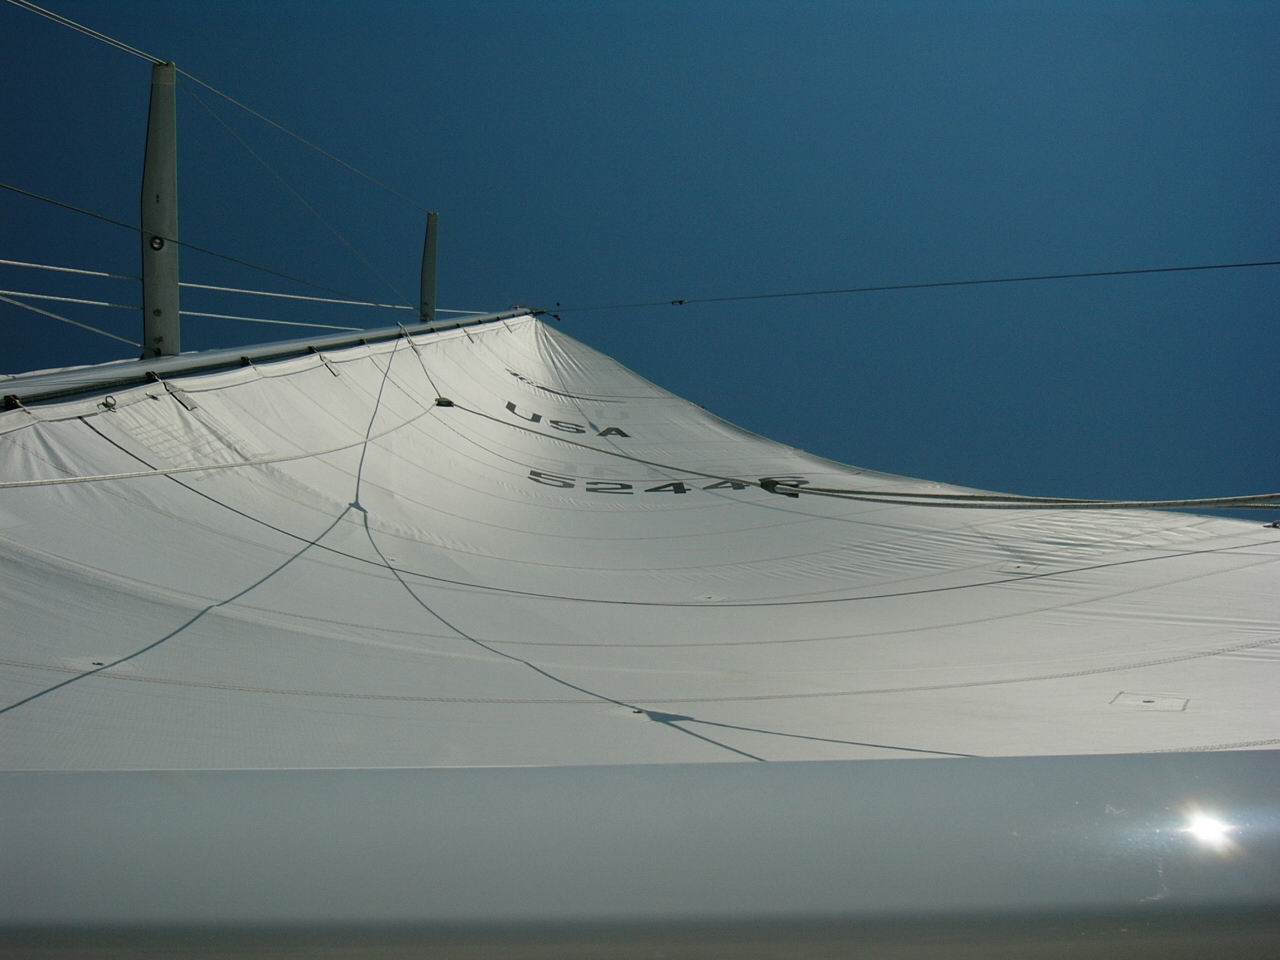
I hope the earlier essays have covered the issues surrounding the full batten question from the sail performance, efficiency & speed perspective.
The ease, or lack of it, with which a FB mainsail can be operated during the various maneuvers a crew must make while at sea full battens offer these advantages:
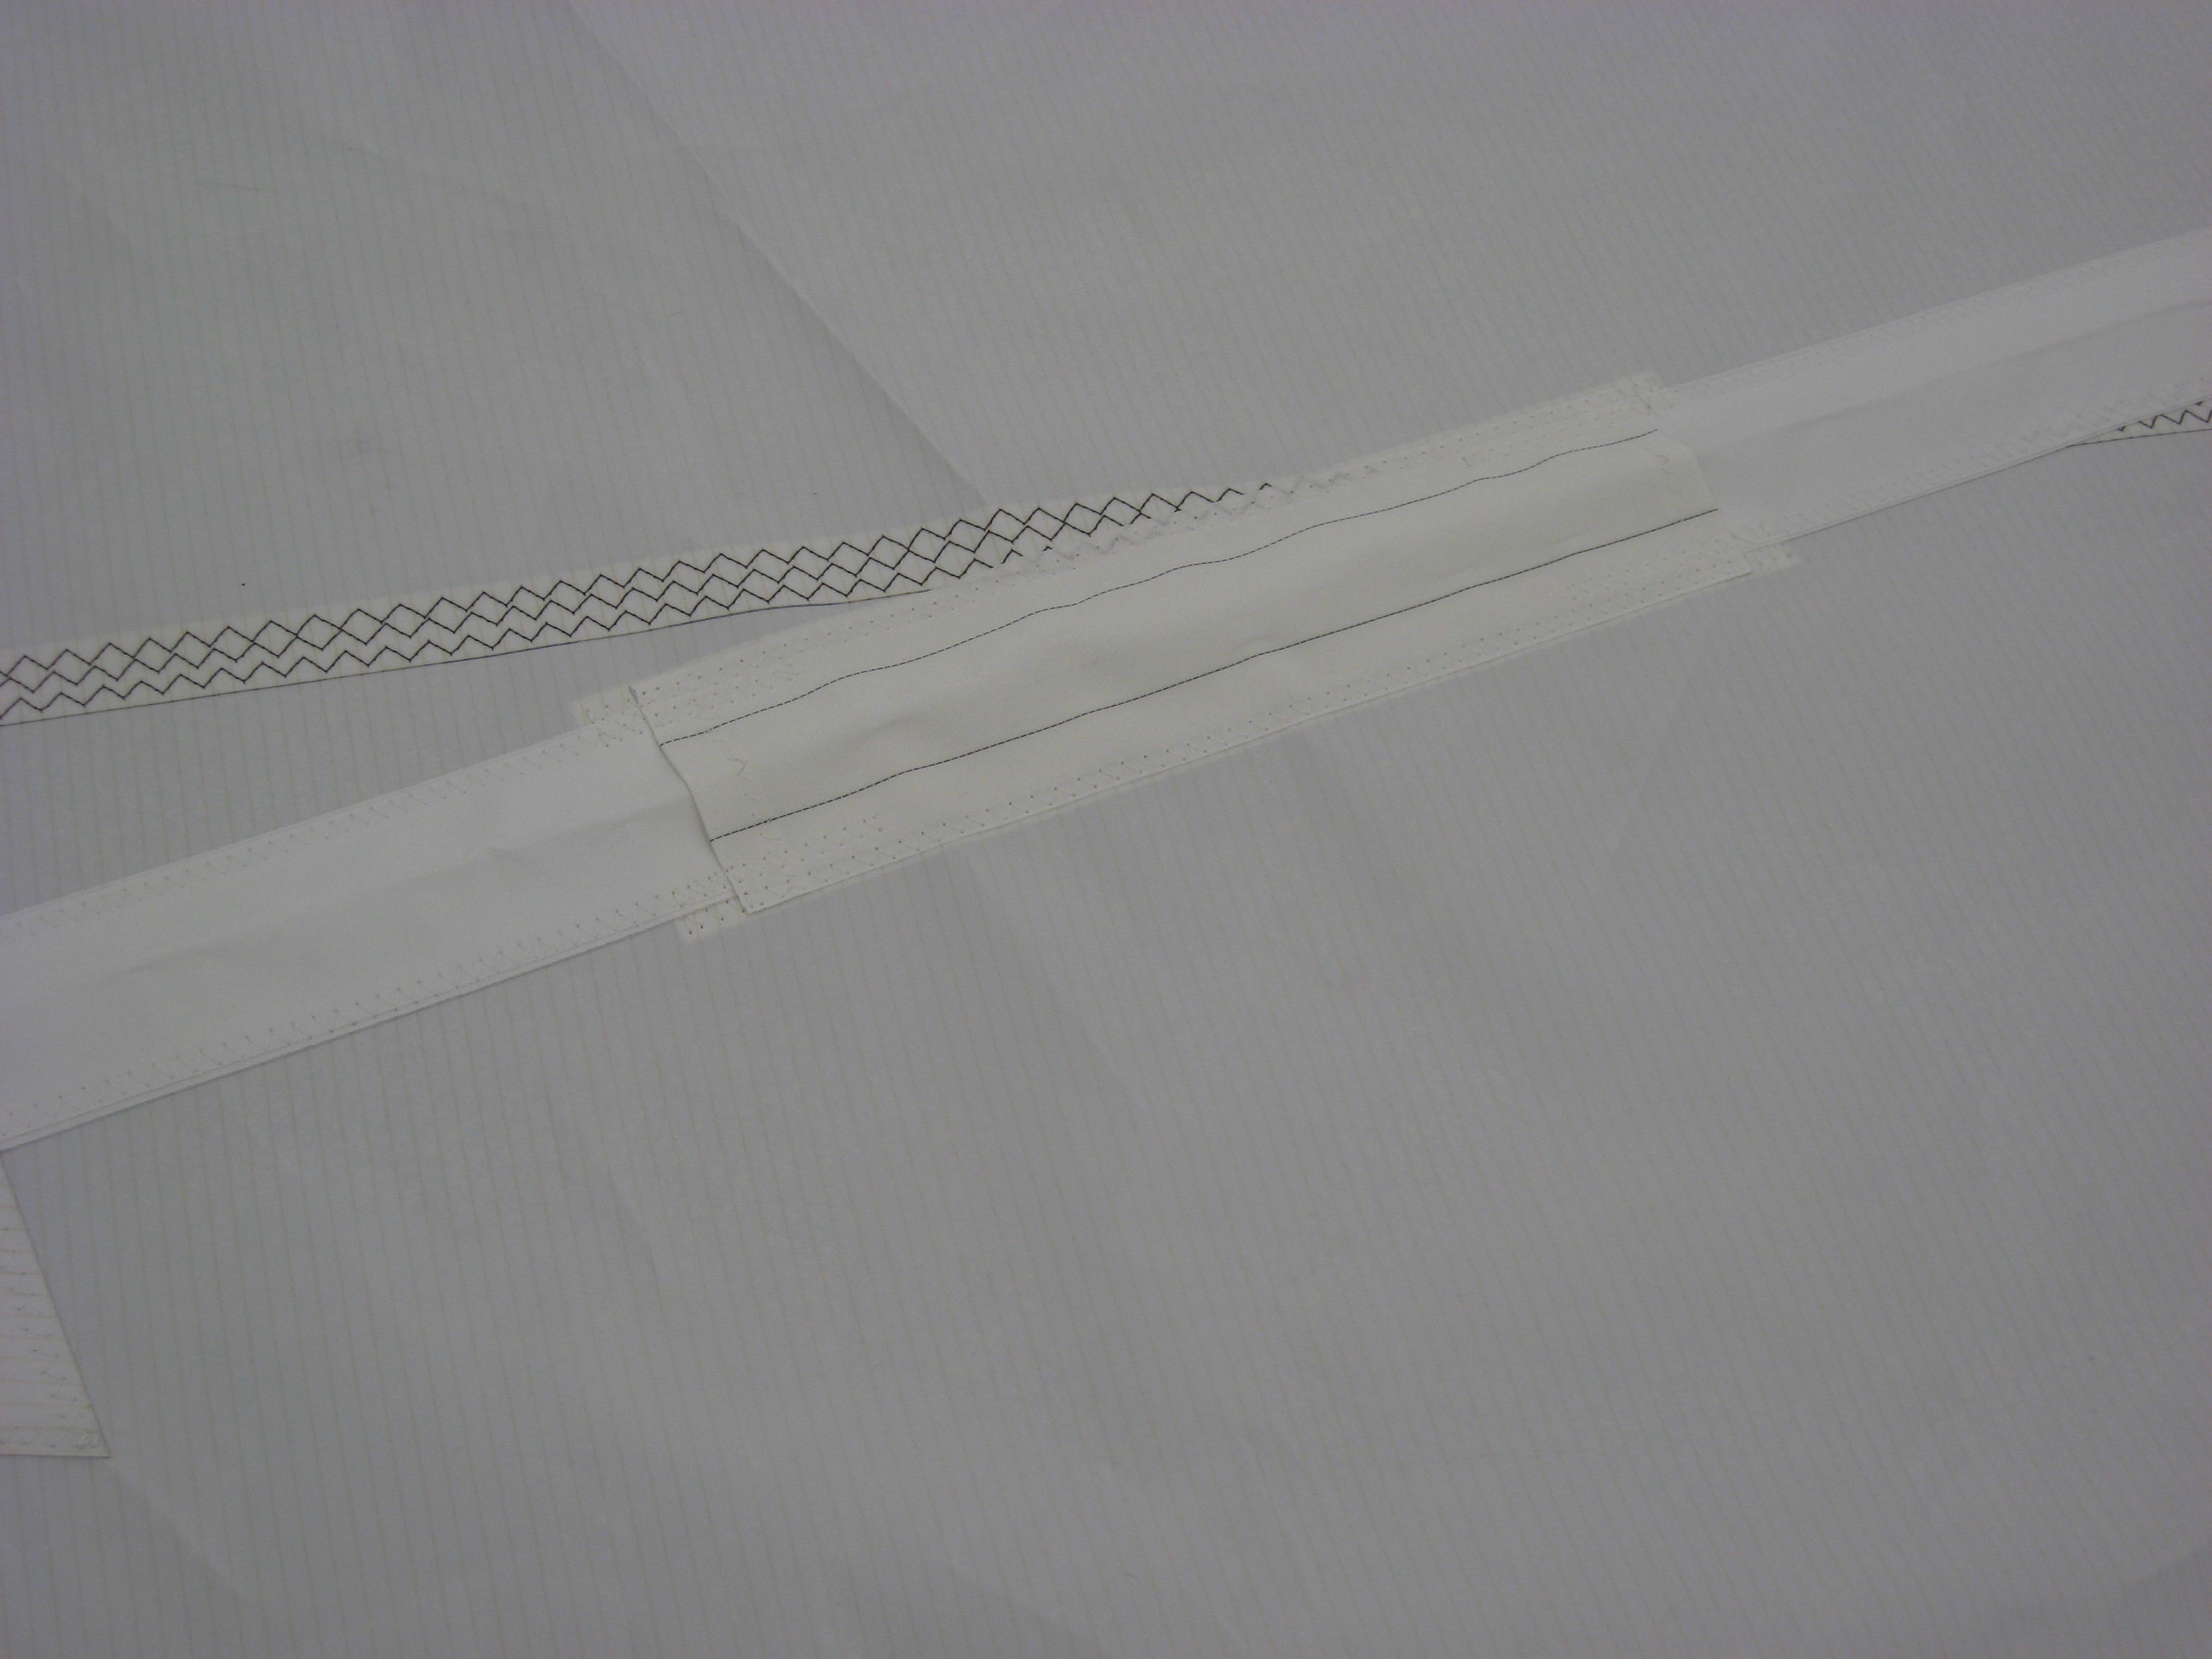
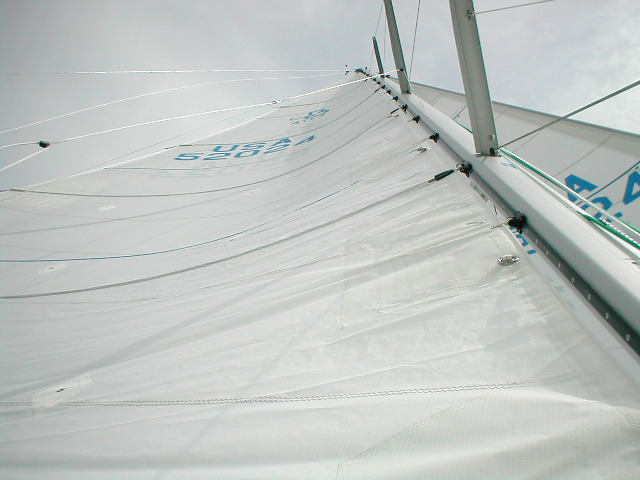
On boats with aft sweep to the spreaders, it is important to have the area where the batten pocket bears on the rigging to be reinforced with sacrificial chafe protection. This image shows just such protection on the pocket of a Deerfoot 60 mainsail Hood built. While chafe protection is a good detail to have on your sail when going of into the open ocean, it is more important on FLB sails due to the grinding effect the batten imparts on the stays, or anything else the batten and sail are bearing on.
- The mainsail is much quieter when flogging the battens reduce the frequency at which the sail flaps-This is because the stiffness and mass of the batten resists the wind force more than a mere “cloth.”
- The effect of the batten separating-pushing the luff from the leech makes it easier to get a hand full of sail and to some degree put it where you want it, particularly if there is some kind of boom bag for the sail to settle in.
- Full battens are more effective at keeping the sail constrained between lazy jacks, even more so if the lazy jacks are located with respect to where the reef points and the batten’s leech ends are.
The real trick that makes ALL of this work as an integrated system is to mate the hardware to the boat, the sail and the intended use of the boat. This requires a combination of learning about the pluses and minuses of each version plus some other contemplation: Much of this information can be supplied by the sail makers and or rigger, but as with any business, they most likely have their own favorite hardware, mainly because they are used to in.
In no particular order some of the details to decide or to think about before even picking up the phone are:
- Track or no track and
- Ball bearings or no ball bearings.
- Number of battens
- Will the battens be installed from the Leech OR the luff
- How the batten pockets will made to will resist chafe
- How the sail is to be captured when it falls down
- What you are realistically going to do with the boat/sails/battens–The further offshore you go, the higher value the most friction free gear you can get will be.
- Stack height
- Reefing details
Making sure the reefing system is coordinated with, in particular, the placement of the battens and cars is one of the important details to get right.
This installment will begin to cover the available hardware for making the most of the benefits of the full batten sail which are to my mind “ease of handling”. It should be noted that the bulk of the following information pertains to the hardware I have seen and or had experience with in the US. Regardless of hardware the principles are the same.
First off a definition is in order for the idea of “ease of handling”
For this discussion ease of handling includes:
- Any hardware-Tracks cars batten boxes etc.
- Or sub-system-Lazy jacks boom bags etc.
- Or technique, practice skill in handling the boat during sail handling activities
OR
- That which makes the manhandling of the mainsail on the boom easier and/or less stressful, and/or safer, whether hoisting, lowering, reefing or unreefing.
Reefing in a seaway is potentially one of the most hazardous parts of sailing a boat. The crew is, often out of the cockpit, it is blowing, often quite hard, there is a sea running perhaps quite large and there is the personal stress factor, both on the part of the crew member doing the work and the master worrying about his crew….

When your weather map looks like this you better be sure that all the gear, especially the sail handling gear, on your boat works 100%, is easy to work, fast,simple and tested.
Traditionally one of the hardest parts of dealing with a mainsail is the friction generated mainly by the slides operating in the track. This is closely followed with what to do with the bunt of the sail after the reef is secured. On modest sized boats this is not so much a problem. If the “Depth” of the reef is say 4,5,6,7 feet- and boat that has three reefs at 7 feet apart might have a rig close to 45-50+ high feet, so perhaps a 40 footer. Depending on all manner of variables it may be sufficient to let the bunt flap to leeward, although personally I would roll it up and tie it off. Boats with a larger gap between reefs of course get progressively larger; the size of everything goes up as do the loads and the weight of everything. The requirements, desirability and the cost (all equaling value) of using low(er) friction luff sliders increases with the size of the boat, the sail and owner’s horizons.
As if this writing, I identify the following categories of luff slide hardware-And yes all of it can be used with a conventional sail with just leech battens too. These categories are:
CARS/SLIDES: With ball bearings and without.
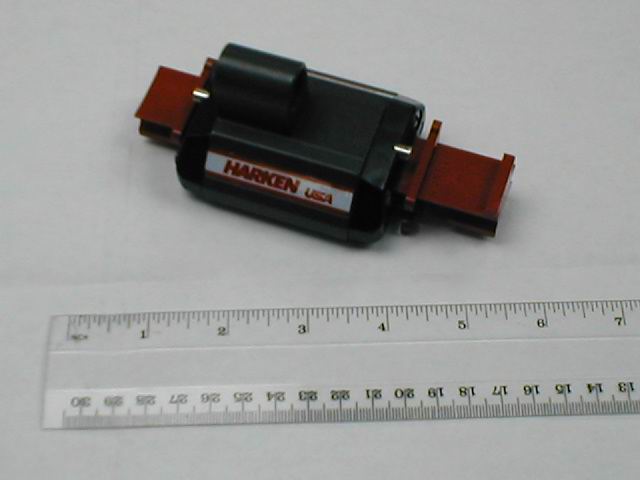
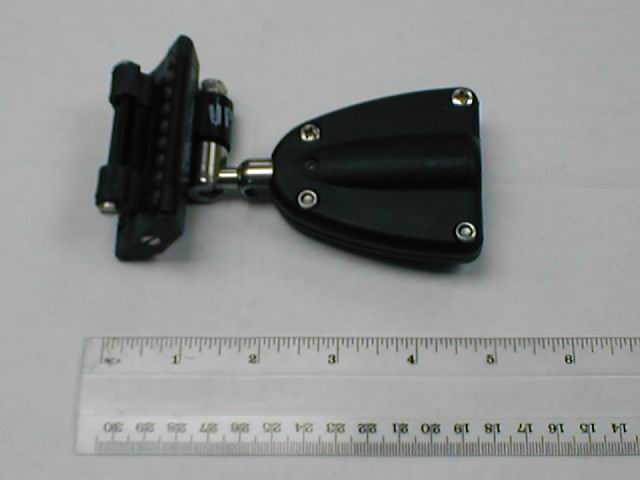
This is a Harken ball bearing car for the batten box to attach to. Originally the red dummy track was used to keep the balls in the car. This has been improved on now so that the balls are held captive in the cars, minimizing one of the great arguments against ball bearing cars.
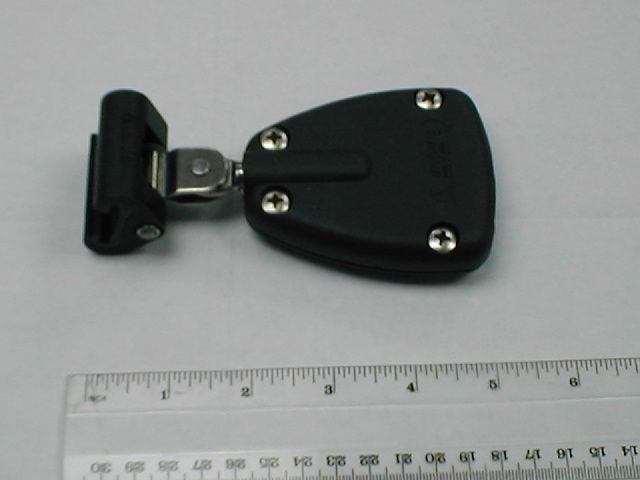
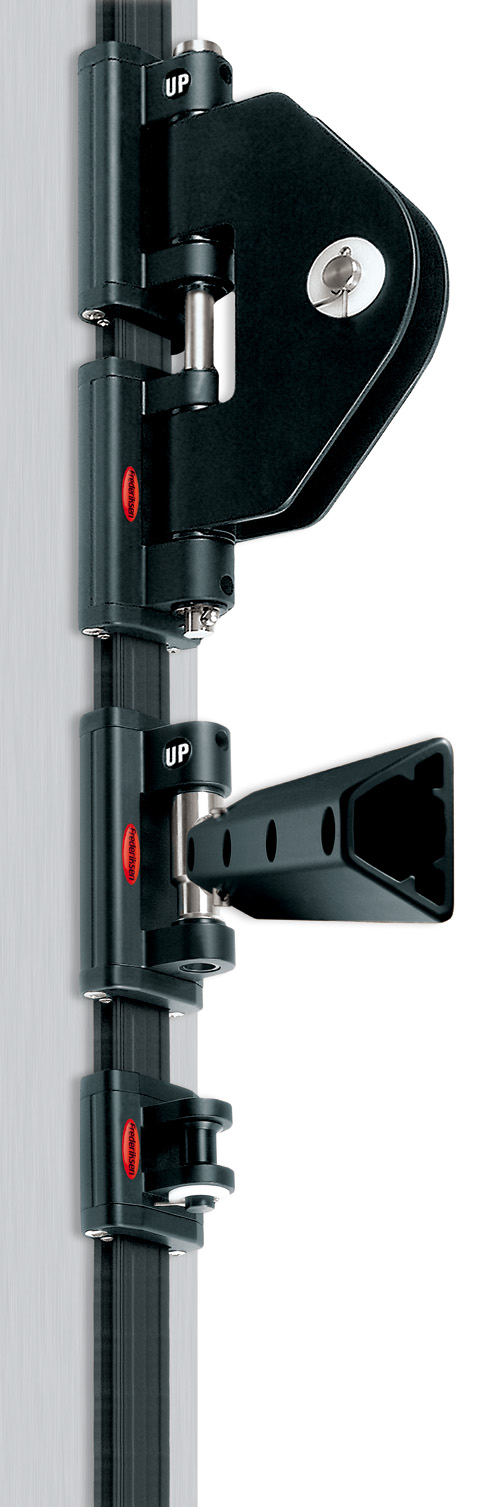
This is Antal track slider & Toggle with Antal leech loading batten box.
TRACK: Those that employ a dedicated track that needs to be installed into the existing mast groove with track. AND NO (dedicated) TRACK-Those systems whose sliders operate in the mast’s groove.
Dedicated track requiring attachment to the spar is a hallmark of a high end ball bearing system
BATTEN BOXES: Those that are adjustable, to tension the batten in the sail and those that merely accept the batten and the batten tension is applied elsewhere, usually from a lashing or Velcro arrangement on the leech.
Batten boxes come in almost as many flavors as the systems themselves.
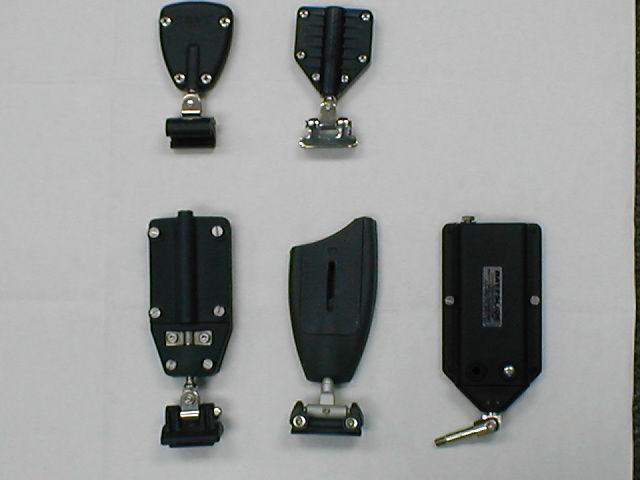
Top two items, L-R: Antal slider with leech load box, Tides Marine slider with their leech loading box.
Bottom three, L-R
Sailman box and slider from Bainbridge. A Rutgertson box and slider
and a Battslide brand box with toggle. This toggle would fit into the Harken batten car, shown above, in the red dummy track and all of the others reference here except Dutchman. Not shown is another box called PNP, roughly similar to the bottom three.
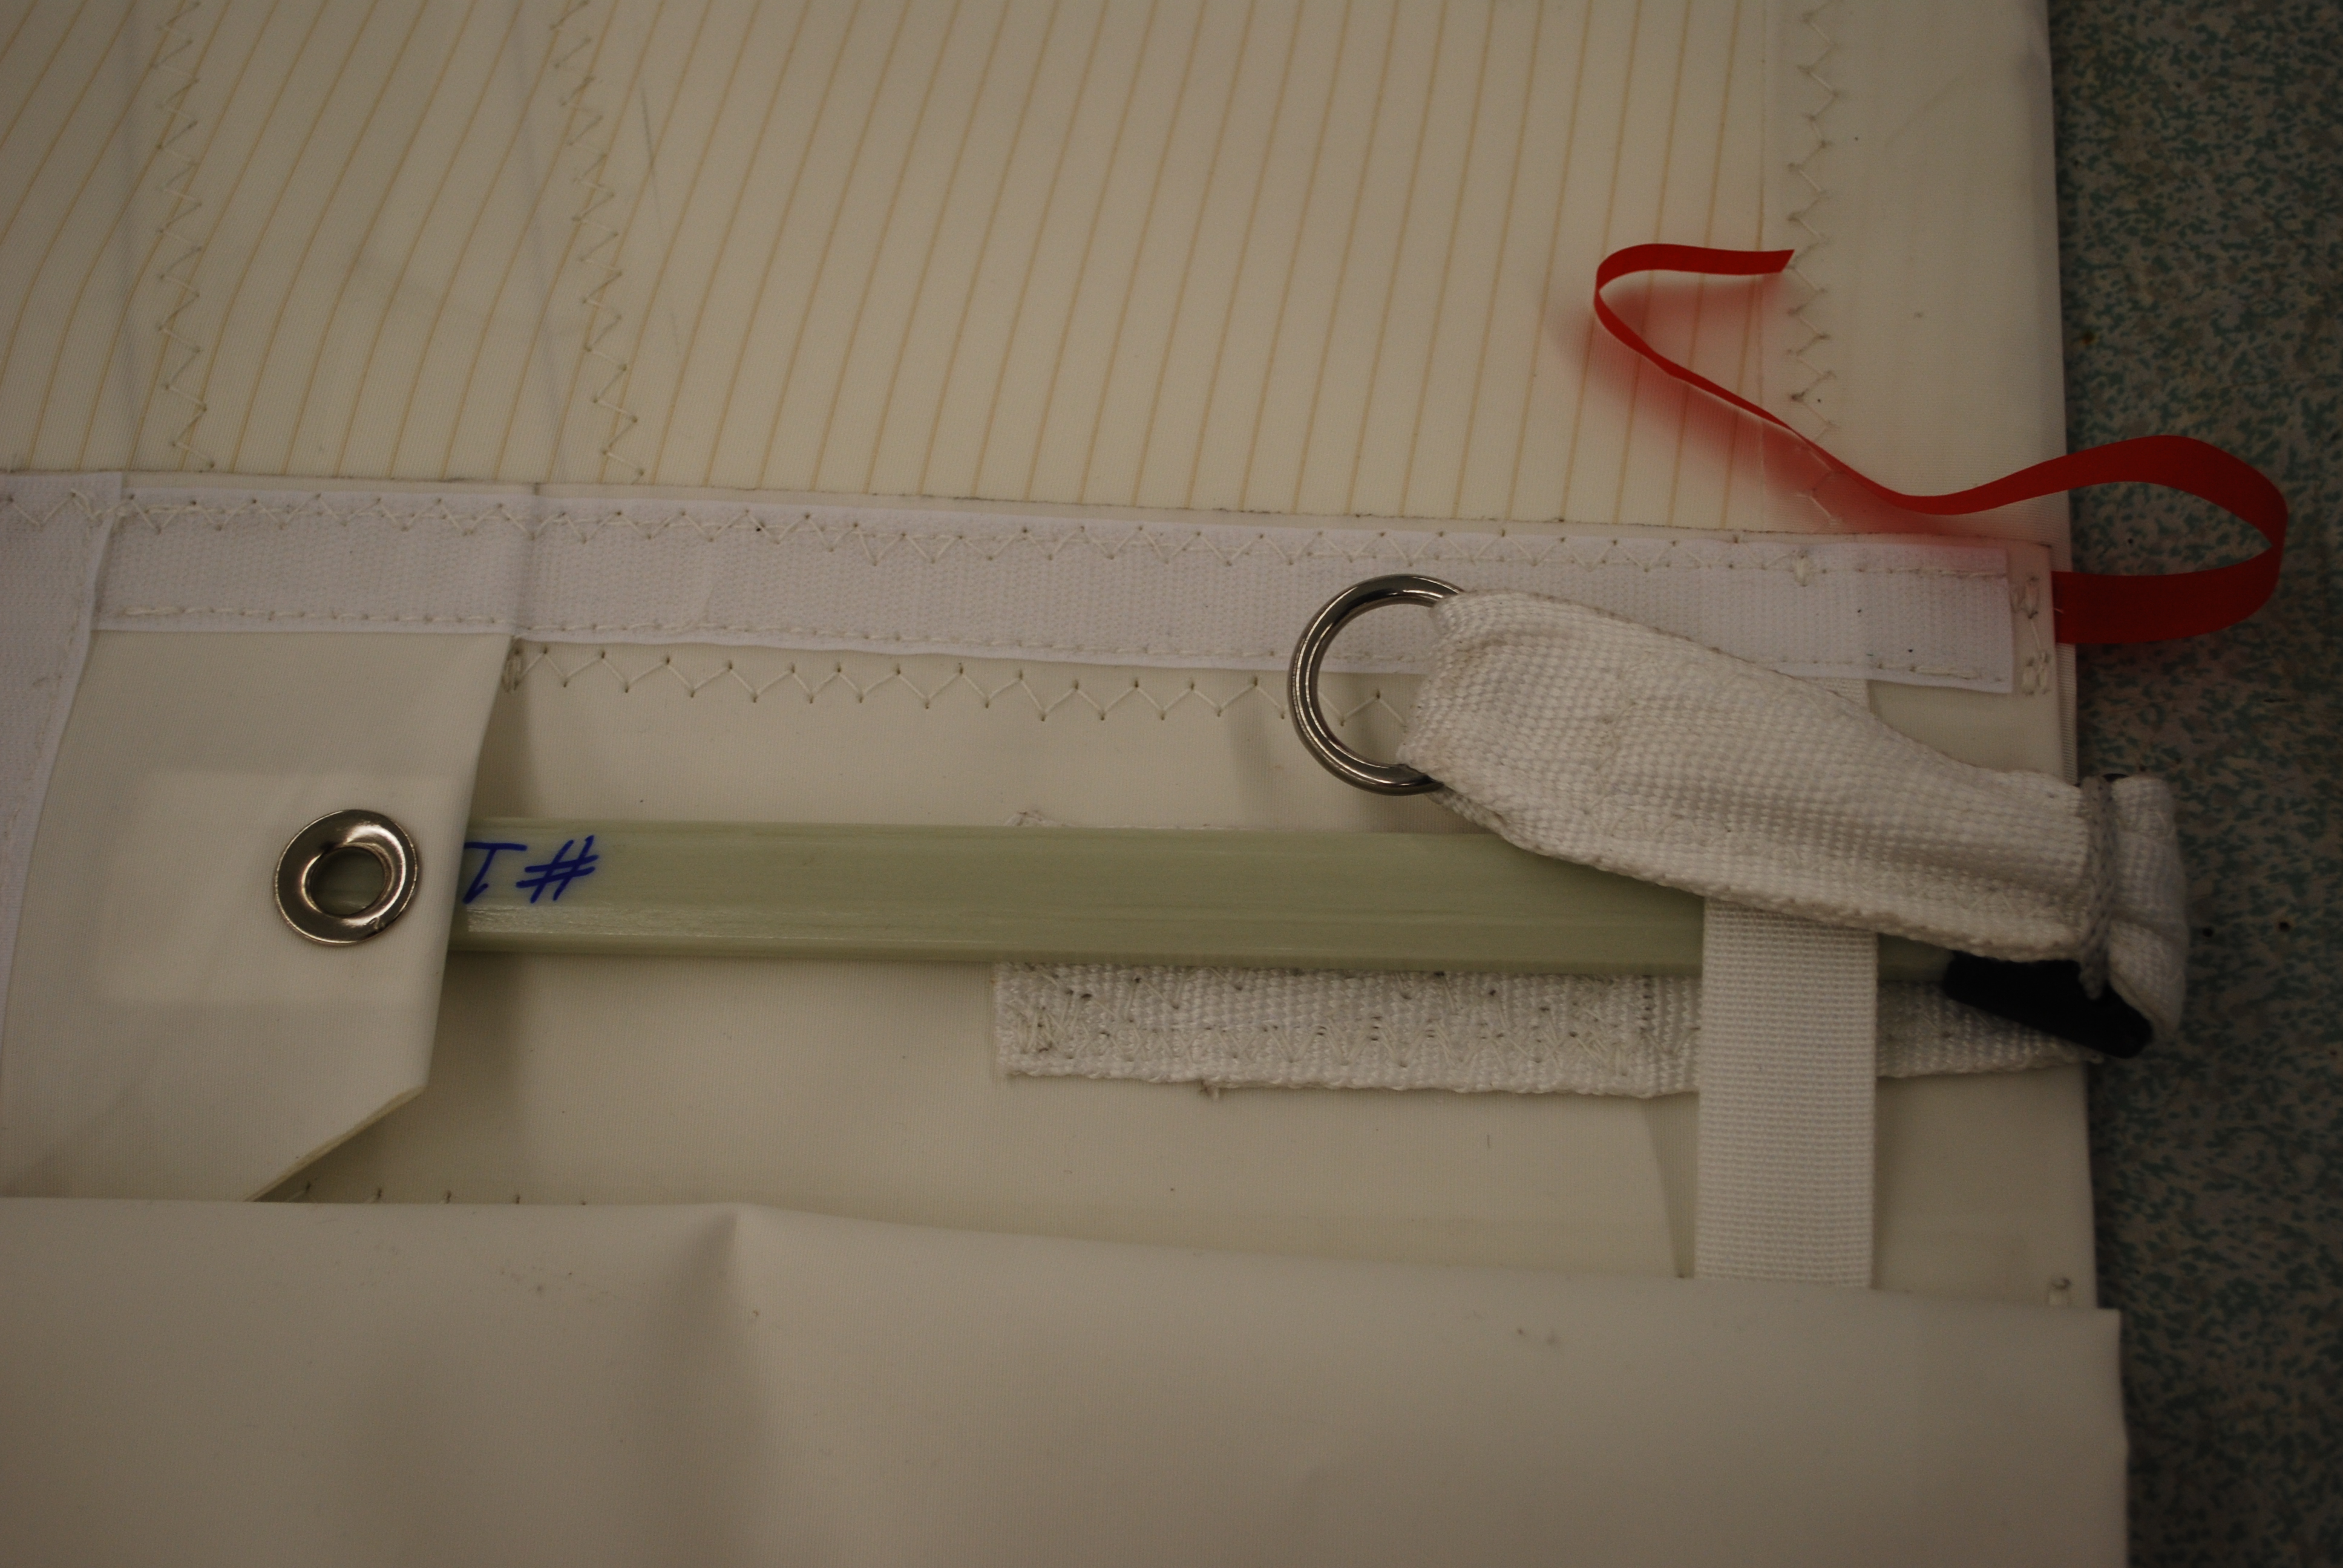
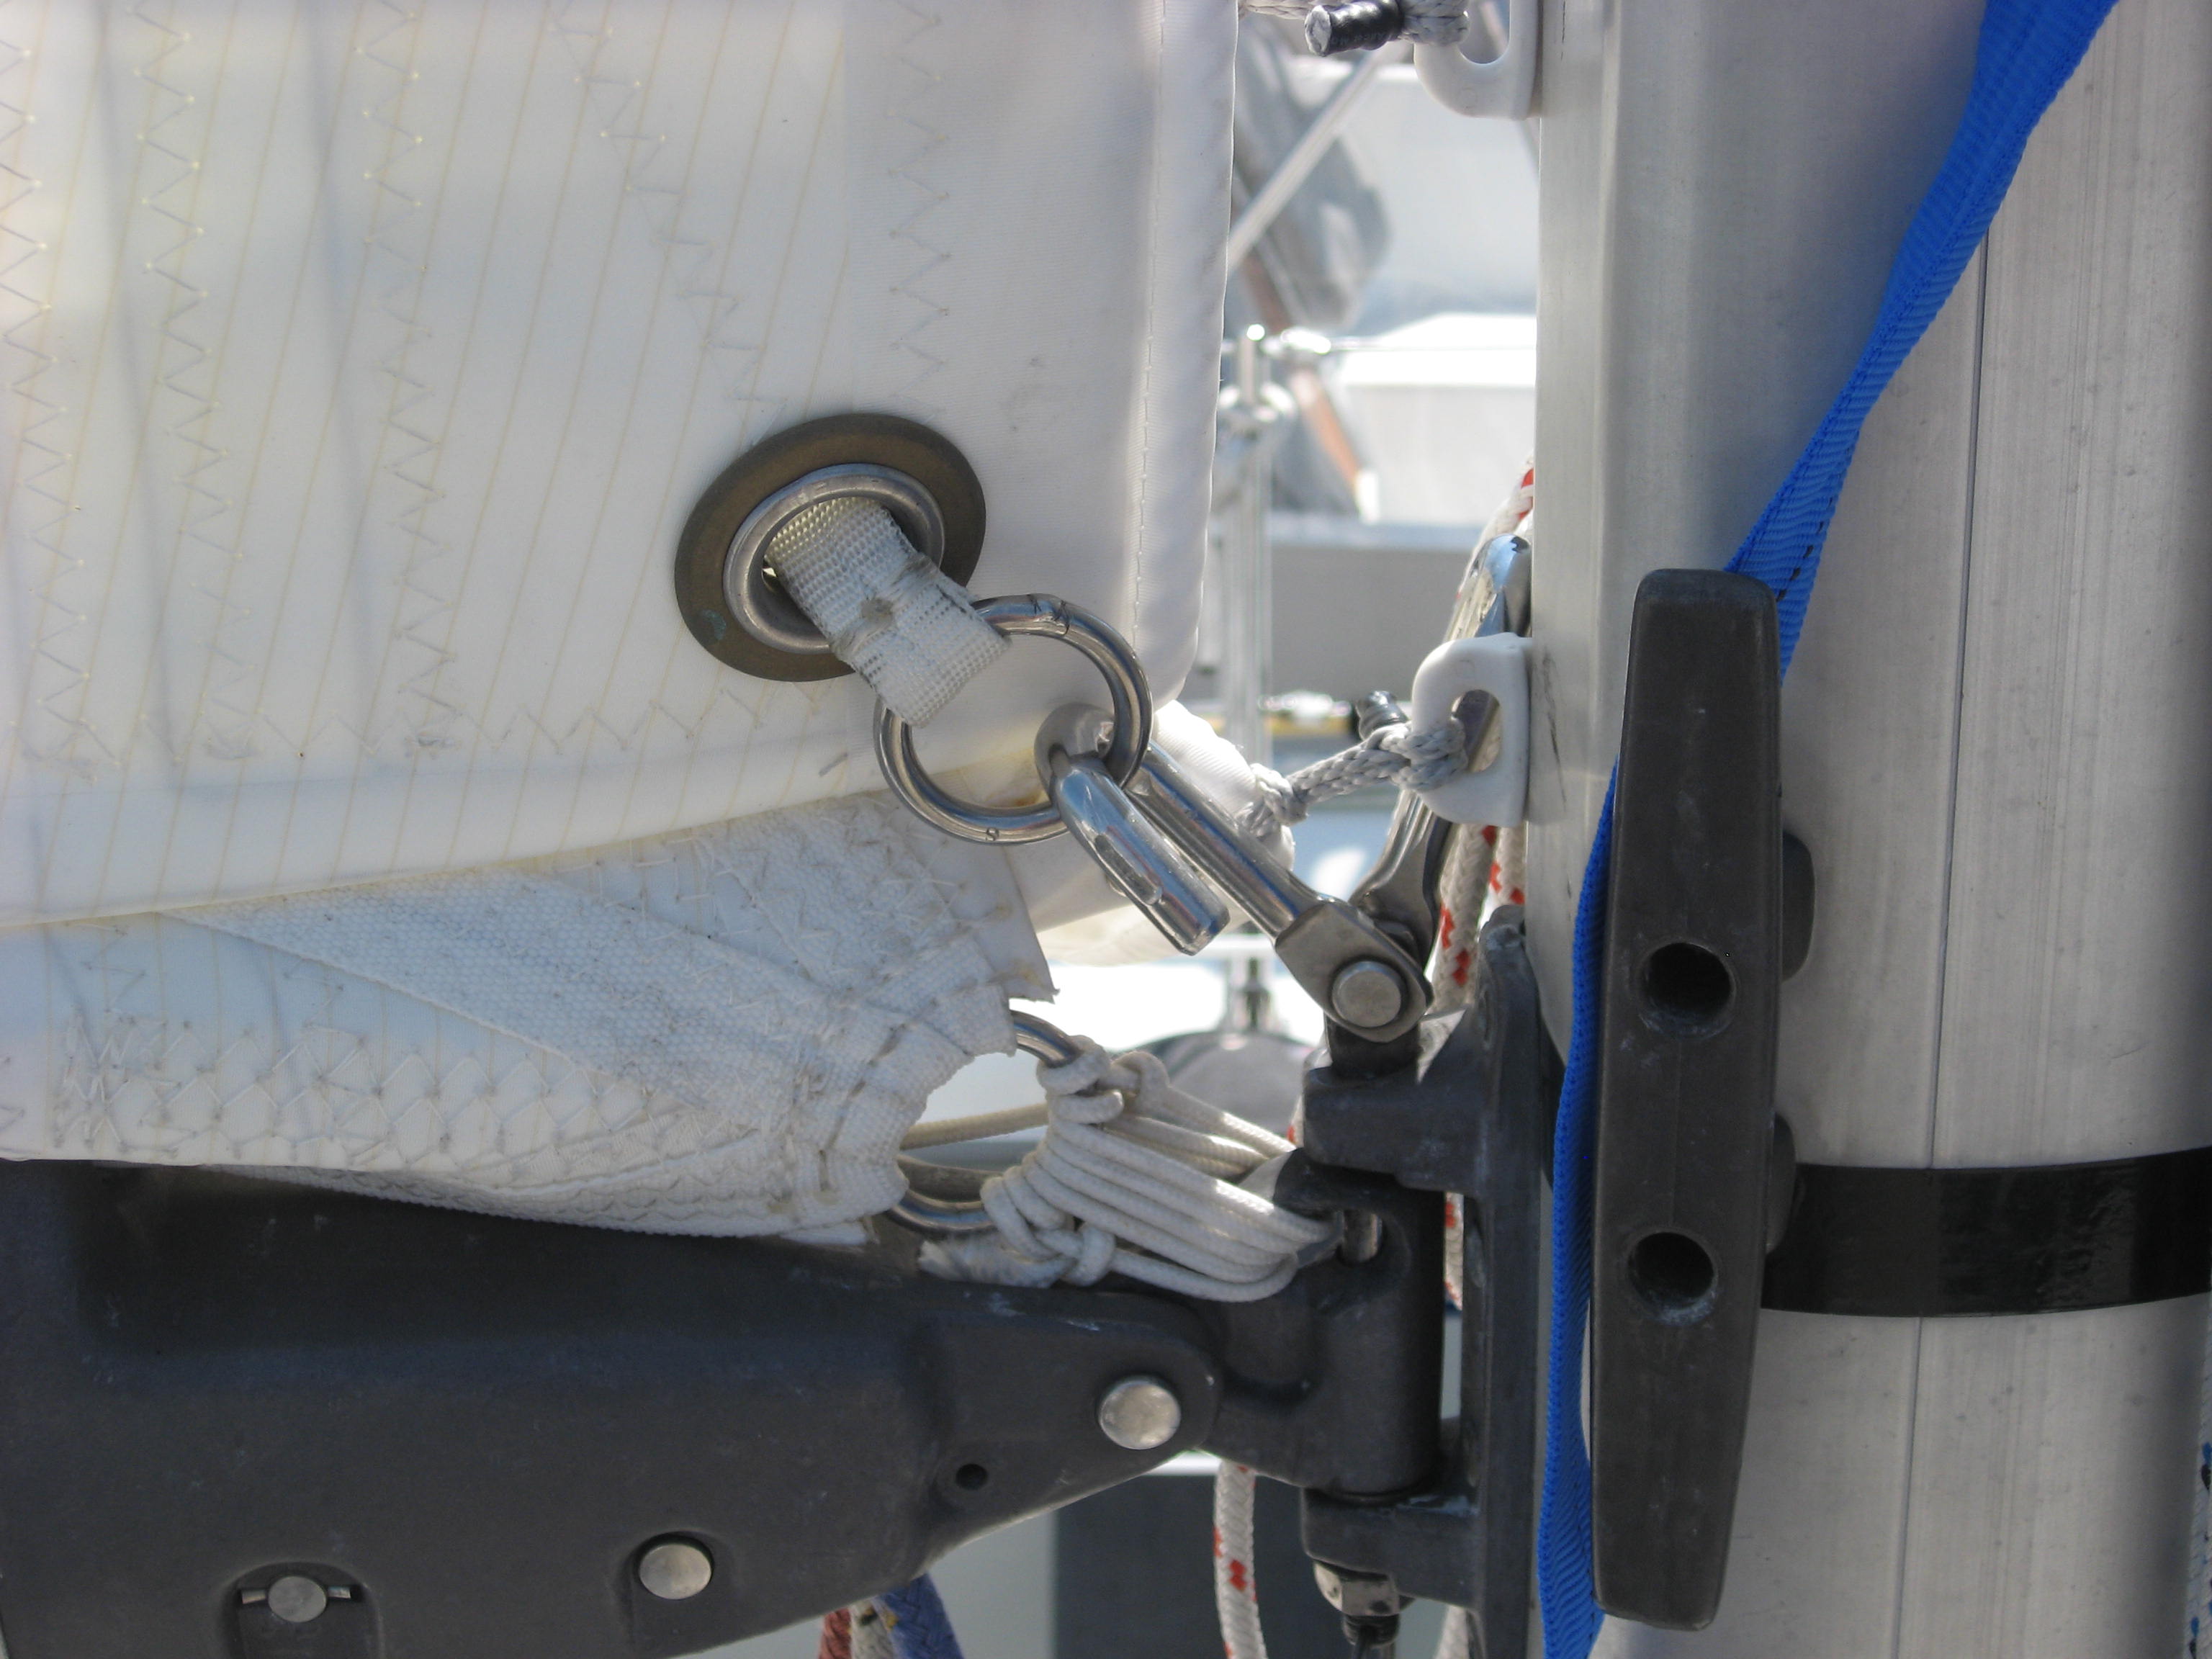
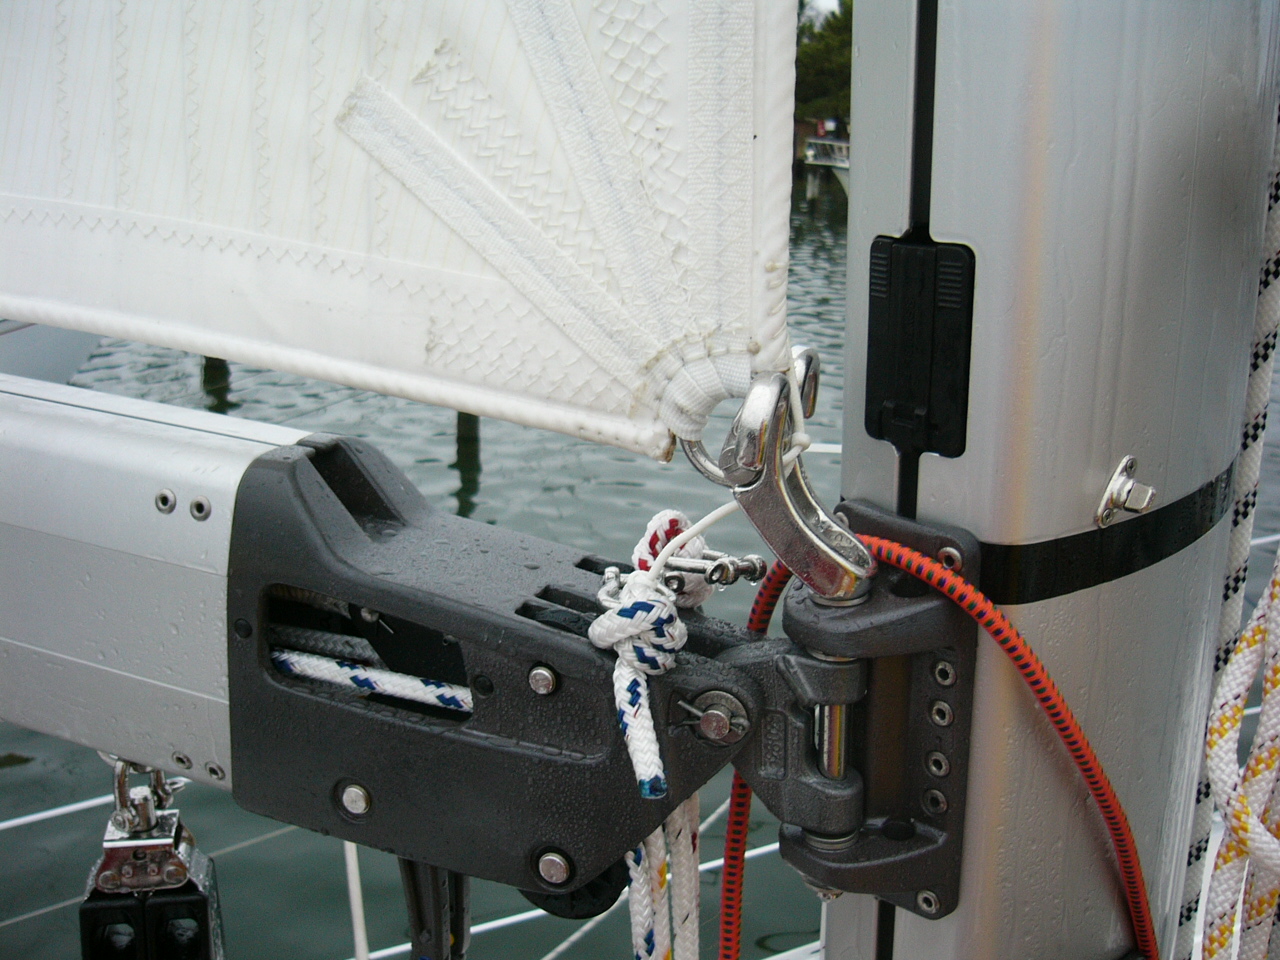
This detail shows a leech loading batten pocket tensioning mechanism. Not only should the leech tensioning method tension the batten, it needs to be engineered in a way that makes it really hard to loose the batten out the end, as when flogging the sail in hard wind while reefing or attending to some drama aboard. This is a good reason for the luff loading battens with adjustable boxes. Adjusting the tension on the batten is a lot easier too-You do not need to be scrambling around up on the boom to get to the leech of the sail, rather you can stand at the mast and use typically a hex socket or sometimes a screwdriver. In this image you can see a length of light spectra lashing , far right, secured through the batten end and around the webbing strap. The batten is tensioned by a lashing (not installed yet) passing through the webbing and the grommet on the flap, to the left.
TOGGLES: These are usually metal devices that connect the batten box to the luff car. They are superior to merely webbing the batten pocket to the car because they maintain a separate specified rigid distance between the sails edge and the car. For the batten box to slider connection a more or less standard M10 and M12 threads on the studs entering into a matching female on the box. The boxes in the image above the one of the leech loading pocket detail, are all connected to their respective slides by the toggle.
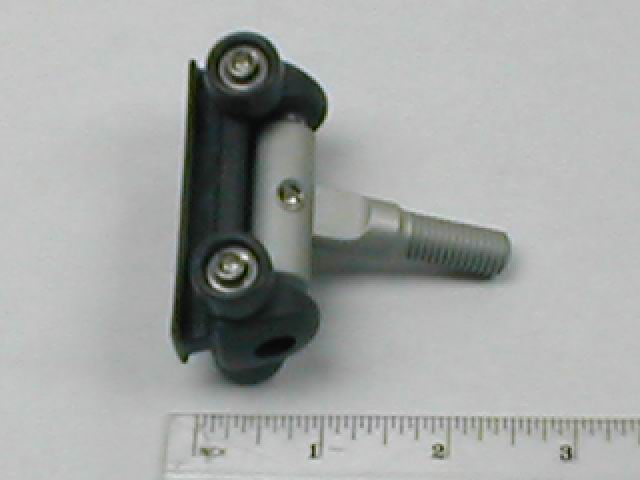
Virtually all toggles are a variation of this version on a Rutgereson roller slide. Most batten boxes have a matching M10 or M12 female into which the stud threads. This slider BTW is one of the crossovers in that the ball bearings are in the wheels, which bear on the outside of the mast tunnel-No dedicated track required.
CROSS OVERS: There are at least a couple of products that offer in-mast sliders that require no dedicated track and have ball bearings or some kind of roller on the slider.
This is one of the most elegant cross-overs-The Ronstan Ballslide. They come in two sizes a 6 and an 8. You can see the “feet” held in place by the screw, on the left of the image and the balls in their cavity. If memory serves the numbers refer to the diameter of the balls.

Ronstan ball slides on a Sabre 30. Perhaps a tad over kill for some, but the owner wanted to be able to reef the main from the cockpit. In order to do that, incorporating all the inherent friction from such a reefing arrangement he needed a low friction solution at the luff. In order to achieve this for him I had to rework a chunk of the reefing system on the boat. All done remotely-He In Michigan & me in Newport. A particular advantage of the Ballslide system is the ability to simply remove the sail from the mast with out worrying about the carriage carriers. In fairness most of the Ball bearing systems with track now do this too but not having to install a track is something many find attractive.
This image does not do justice to the Selden system. On the other hand since you need a new spar tube, it is not the most marketable system. The cars operate INSIDE the spar in a cavity extruded into the spar and are introduced through the black fitting seen here.
CARS/SLIDES: WITH ball bearings:
HARKEN: It will be no surprise that most people’s first thoughts turn to Harken, at least in the US, when the phrases “boat gear” and “ball bearings” are used in the same sentence. The brothers Harken have cars and sliders, ball bearing and not, plus the required track for every size of boat from small, like a J-32 to 90 feet and/or 140 sq. meters, about 1500 sq. feet.

A very typical combination of Harken ball bearing car with a Battslide box. The Battslide box shown here has been superseded by a later generation with improvements on how to get the batten in and tensioning details. Battslide boxes are manufactured by Schaefer.
RONSTAN: In some quarters, perhaps expats, like me, familiar with Australian sailing equipment, recognize the Ronstan name too. Like Harken, Ronstan has track and car systems for boats as as small as 40 FEET up to 45 METERS.To be fair to Harken, they too offer custom solutions for boats over 90 feet
This is a one combination of the Ronstan equipment. The sticker says Frederickson because that was the name of the company before Ronstan purchased them a few years ago.
FACNOR: Followers of French boats would recognize the Facnor name in reference to headsail roller furling and not associate them with roller bearing mainsail luff track hardware. The Facnor equipment is nicely made and revolves around one track size, with the cars getting progressively bigger for larger sail/boat applications. They offer systems suitable for sails up to 130 square meters.or roughly 1,400 square feet.

Facnor track car toggle/Stud with a Sailman box. The track size stays the same but the cars get progressively bigger for bigger loads.
SELDEN: offers a hybrid in their MDS system. This however requires a new spar tube since the Selden cars run inside a special cavity extruded into the tube, so rather impractical unless you are getting a new mast or boat as in fact this owner was doing-A Saga 43 in this case. Selden also has a track and ball bearing system called RCB in two sizes. Selden calibrates the correct equipment based on the boat’s displacement. This system is interesting because it has a novel way of easily disconnecting the sail from the cars, the latter thus stay on the spar.
These four all use a dedicated track.
TRACK ATTACHMENT: There are four ways to attach the track to the spar. Either fasten the track to the spar with the appropriate sized metal thread fasteners. Use the connection slugs offered by the equipment maker, slide the tack into the mast groove-Tides and Dutchman or glue it on, for Carbon spar applications
RONSTAN: has a cross over product called a Ballslide that has recirculating ball bearings in the car and a variety of screw-in shapes they call “feet” that will, at least in my experience, fit any mast groove one is likely to find. This is one of the hybrid products.
RUTGERSON: Another hybrid slider with ball bearings, albeit really small ones, is from a long established Swedish sailing hardware firm called Rutgerson. Their products are distributed in the US by Challenge Sail cloth, another supplier of sail making bits and pieces to the trade. The Rutgerson cars/sliders look like a beach or moon buggy and the bearings are in the wheels of the buggy.
DUTCHMAN SYSTEMS: From the folks who brought you The Dutchman flaking system, is their entry in the luff track stakes. The Dutchman has two versions. A dedicated track option and a track-less roller bearing cars option. The later has a similar “Beach Buggy” looking batten slider, see below.
CARS/SLIDES WITHOUT ball bearings:
BAINBRIDGE- ALLSLIP: At the simple end of the spectrum there are “regular” luff slides that can operate in the masts own luff groove and do not need a dedicated track. The most common slides one step up from merely using the slide the sailmaker would use regardless of whether the sail had FLB or not, are called Allslip Slides. They are marketed in the US through Bainbridge, one of the main suppliers to sailmakers of the nuts and bolts of every-day sail making as well sailcloth. Allslip slides are made from a low friction plastic, not nylon as the bulk of the rest of the luff slides are.
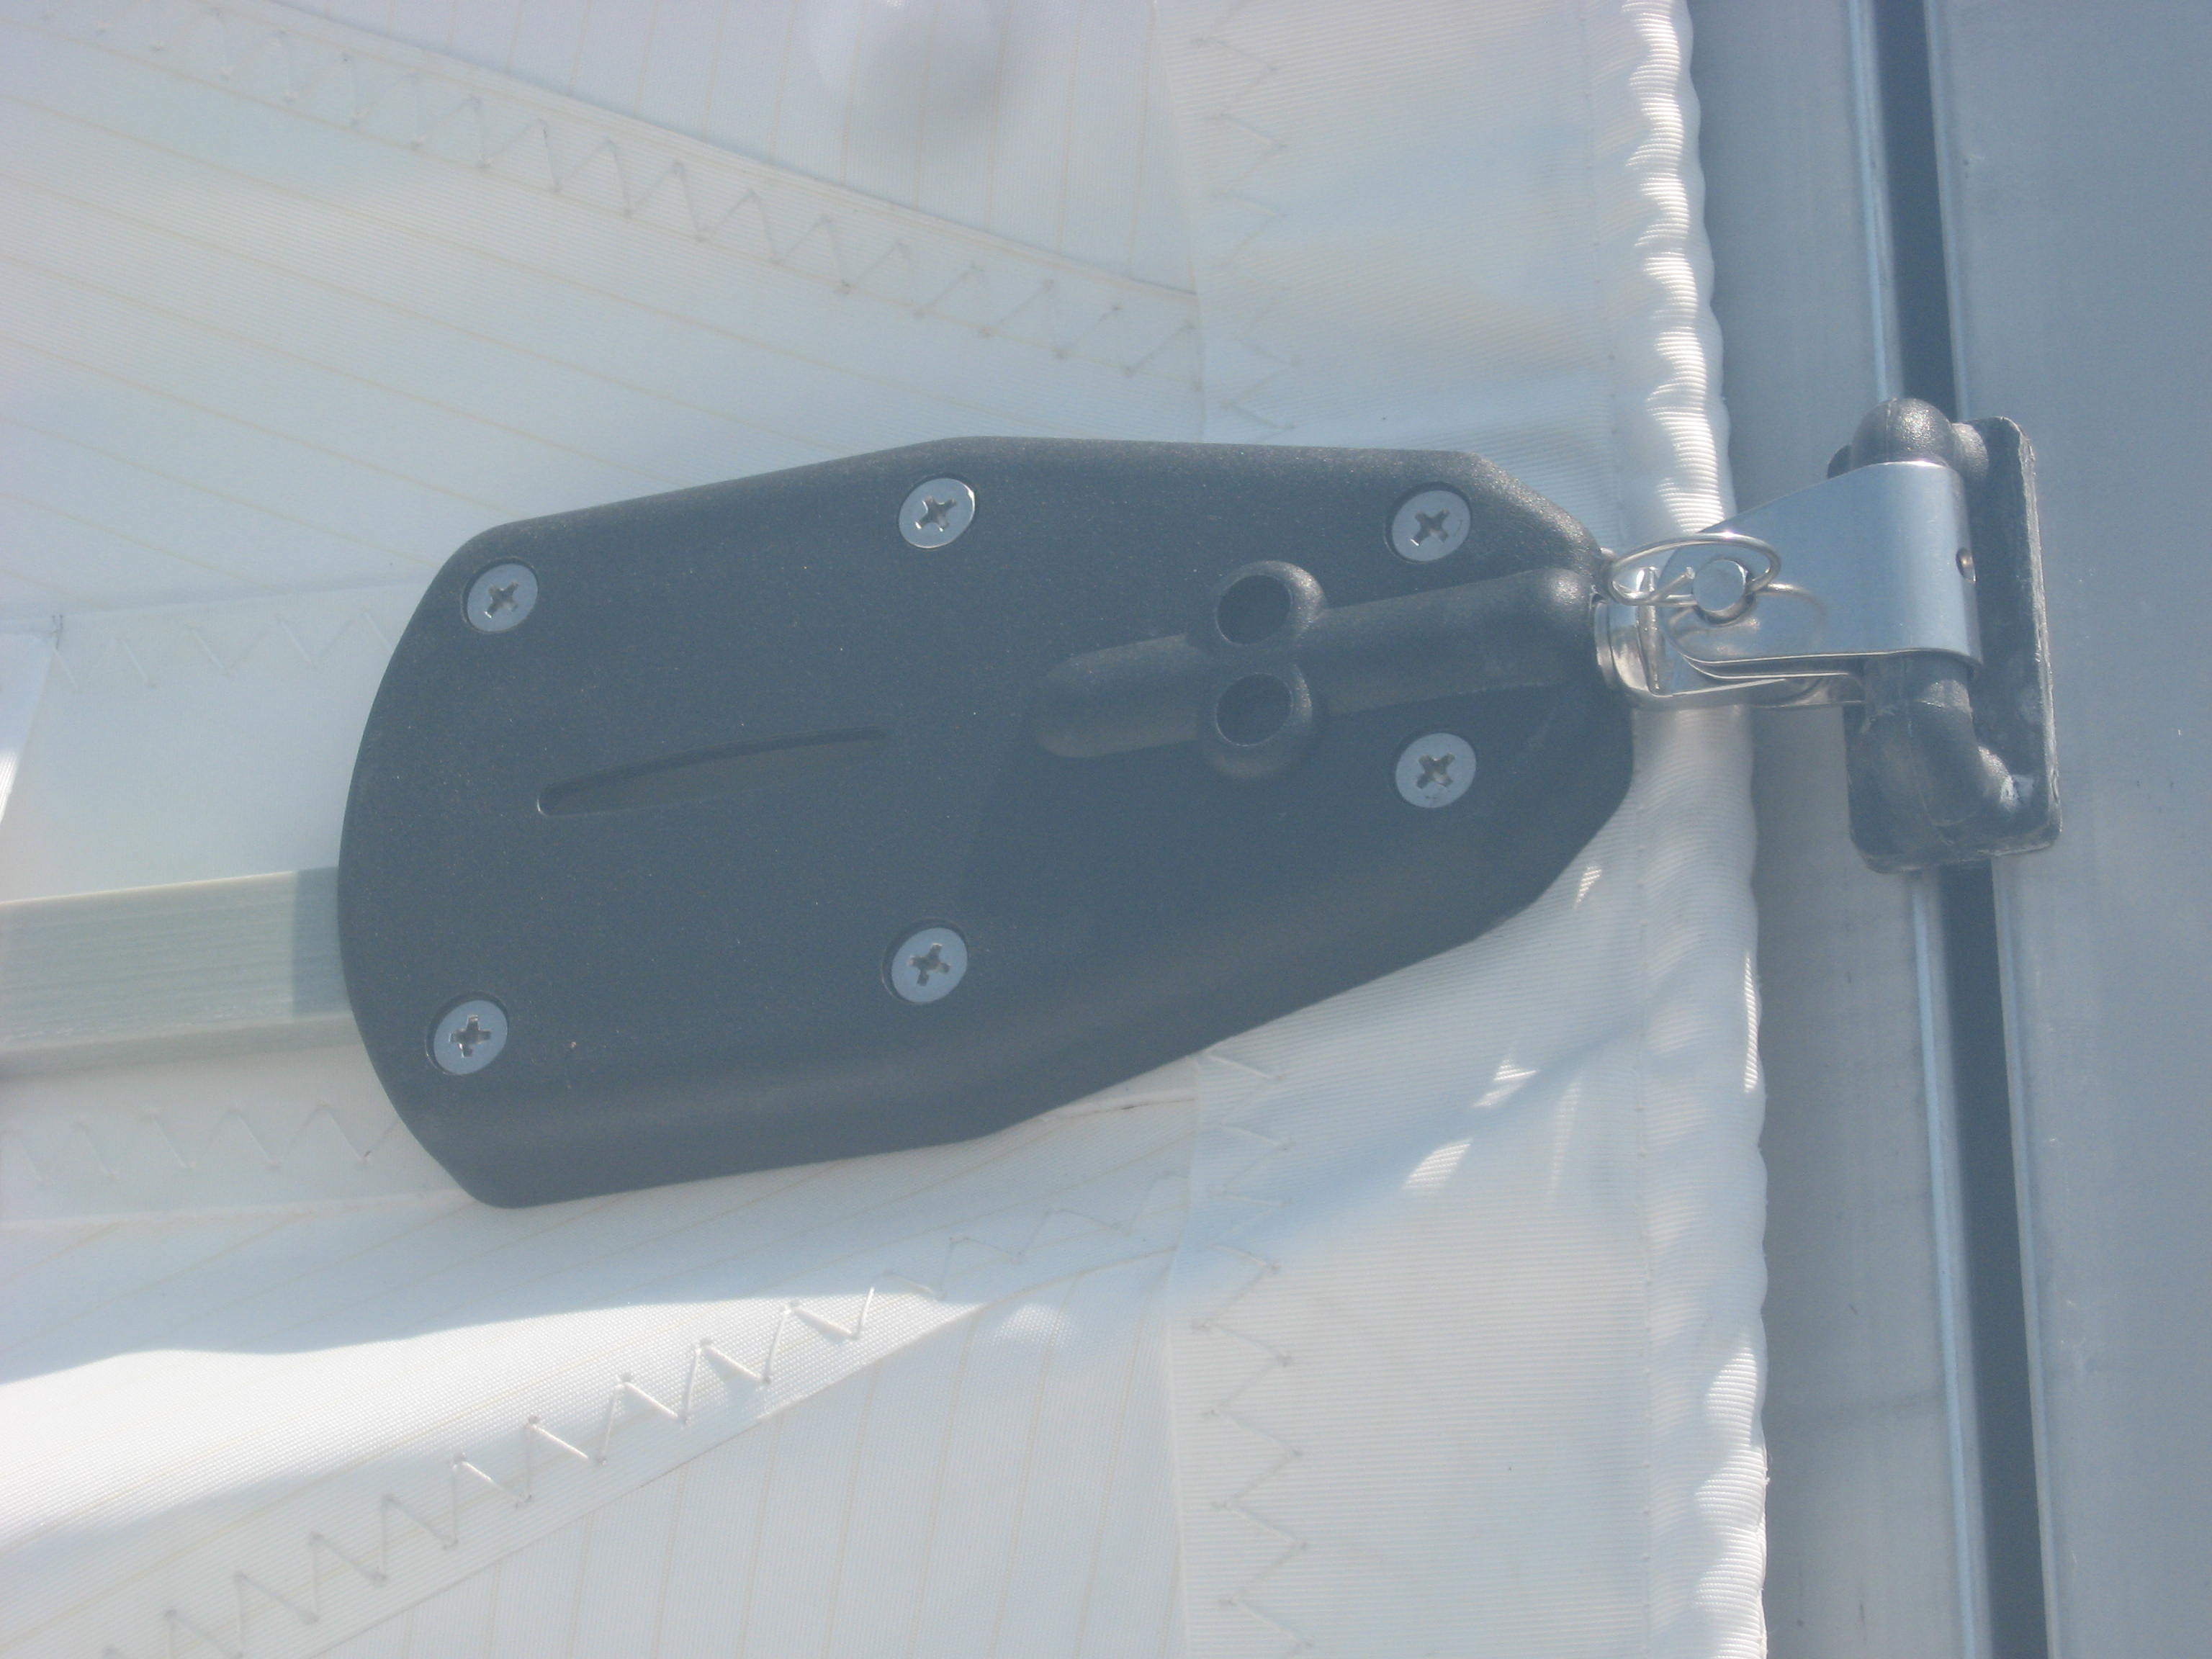
A Bainbridge Allslip slide with a stud to a PNP batten box. When using Allslips, there needs a toggle with a slightly different front end, where it connects to the handle on the slider.Regardless of the connection to the slider the box connection will use an M10 or M12 thread.
Bainbridge also offers their own integrated FB line they call Sailman. Sailman consists of a range of slides, toggles and boxes for three varying sizes of boat or sail area. The toggles they use in the Sailman can also be used with the Allslip slides. This feature works particularly well with Selden spars whose luff groove profiles are unique to their mast sections.
TIDES TRACK: A company based in Florida called Tides Marine, that is in the slippery plastic business, offers a high value product. This is an extruded low friction plastic that comes rolled up in a spool, like a garden hose thus minimizing shipping costs. The requisite number and type of slides go to the sail maker. The track mates to your existing mast track, particulars of which are determined by a set of templates they send you or their dealers have. Propriety stainless steel slides that work only in their track (and others slides do not…) are available in three sizes of height: Intermediate, batten or reef slides and head slides. They are roughly 1”, 2” and 3” tall respectively. Tides offer their own batten “boxes” aka receptacles but these are leech loading only.
DUTCHMAN SYSTEMS: The ever enterprising Martin Van Breems is also in this arena with two products. One is similar to the Ronstan Ball slide and the other is a track system product similar to Tides System using a low friction plastic proprietary extruded track and dedicated sliders. The Ball slide version incorporates small SS balls in wheels that run on the outside of the spar’s groove to accept the compression from the FLB and look largely like the Rutgerson moon buggy design.
The main difference between the Dutchman dedicated track version and Tides product is the Tides slides run INSIDE their track and the Dutchman system runs on the OUTSIDE of their track. The second important difference is the Dutchman track system hardware is unique to Dutchman.Thus no other cars or sliders will fit on the track and they do not have the ability to use third party toggles or batten boxes.
ANTAL: is a prominent Italian manufacturer of all sorts of sailboat hardware hardware. They have a dedicated track with slider system. These sliders have a low friction fiber composite insert. Antal also has roller bearing cars at the upper end of their range. They too come in a variety of sizes suitable for smaller boats up to 100 feet. They offer their own propriety batten boxes. Their batten sliders come with the virtual industry standard 10 mm and 12 mm threaded studs.
SCHAEFER MARINE: also has an offering in this non-ball bearing field. They have a selection of “normal” sliders, toggle connectors and the very widely used original Battslide batten boxes. They also have a dedicated track one can install but I have never seen the advantage of this unless the spars extruded track is damaged in some way. They offer a wide cross section of sliders to fit probably all mast sections built in the US in the past 50 years, With and with out “rigid” toggles, but attached by shackles to the slider. Thus their products is frequently seen on smaller boats where the proportional cost of Full Length battens and related hardware is a bigger percentage than on a larger boat.
Next up: The Battens followed by “all the things you didn”t know, you didn’t know…